


Yesterday I got an email from one of my esteemed readers who asked "Is there any way to deselect all radio buttons using HP QTP?" I thought why one would do that but since it has been asked, it has to be answered.
Before answering the above question let me explain that, radio buttons work in groups unlike checkboxes. It means, in a group only a single radio button can be selected. Afterwards, its not possible to deselect all radio buttons in that group. Even manually it can not be done.
Inititally the task seems impossible but its not :)
It is definitely possible to deselect all radio buttons using QTP but it can only be achieved with the help of Document Object Model or DOM.
The QTP Script for the same goes here:
Set Obj = Browser("Google").Page("Google").object.getElementsByTagName("INPUT")
For each RadioBtn in Obj
If lcase(RadioBtn.type) = "radio" Then RadioBtn.checked = False
Next
To know more about the Document Object Model in QTP, see here : http://msdn.microsoft.com/en-us/library/ms533043(VS.85).aspx
Also read about the Object property in WebRadioGroup Object in QTP help for more information.
Note:
Document Object model is supported by Internet Explorer browser only & not for Firefox as the underlying COM technology is not supported by Firefox. Hence, for Firefox browser, QTP will not be able to access the radio buttons using Document Object Model.
Also working with Document Object Model inside HP Quicktest Professional is faster in terms of performance as no object identification is involved.
Read more...
Thursday, October 22, 2009
Sunday, October 4, 2009
QTP: Adding Hyperlinks in Excel Spreadsheet
I was playing with the excel application along with QTP when suddenly I thought of adding a hyperlink inside an Excel spreadsheet from Quicktest. Task seemed a bit tricky initially but I took up the challenge and finally created a script.
The QTP script to accomplish the same goes here:
'Create an object reference to Excel. Also you can see "Excel.exe" 'process gets created in the Task Manager
Set objExcel = CreateObject("Excel.Application")
'Make the invisible Excel application visible
objExcel.Visible = True
'Add a workbook to the blank excel sheet
Set objWorkbook = objExcel.Workbooks.Add
'Get the handle of first sheet
Set objWorksheet = objWorkbook.Worksheets(1)
'Enter the value in A1 cell inside your first worksheet
objWorksheet.Cells(1, 1) = "QTP Expert"
'Create a range encompassing only the single cell A1
Set objRange = objExcel.Range("A1")
'Add a hyperlink to that range. Here range is only a single 'cell so hyperlink would be created
Set objLink = objWorksheet.Hyperlinks.Add _
(objRange, "http://www.quicktesthp.blogspot.com")
________________________________________________________________
If you like this Article, I would suggest you to subscribe my RSS feed. This way you will get all new future articles directly into your mailbox.
________________________________________________________________
Read more...
Saturday, October 3, 2009
HP QTP Crypt Object
As the name implies, the "Crypt" object in HP Quicktest Professional is for encrypting the strings which can only be understood by QTP's "SetSecure" method. "Encrypt" is the only method supported by the QTP "Crypt" object.
The syntax is:
Crypt.Encrypt(Your String)
An example for the same would be:
'The string "ExpertQTP" would be encrypted
var=Crypt.Encrypt("ExpertQTP") msgbox var
The output of the above code would be "4ac6e9ba26cad2886bf331a767bfa1ce055f68e66bed5d61". As you can see, this string is encrypted which cant be understood by anyone.
Please Note: Recording on password protected fields automatically encrypts your string for example
Browser("micclass:=Browser").Page("micclass:=Page").
WebEdit("name:=Password").SetSecure "4ac6e9ba26cad2886bf331a767bfa1ce055f68e66bed5d61"
Now lets see how to decrypt our string. Sounds Interesting.. Alright!! Lets read more.
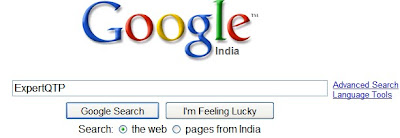
Open your Internet Explorer browser and navigate to Google homepage. Copy and paste the below mentioned script in your QTP editor and run it.
Browser("micclass:=Browser").Page("micclass:=Page").
WebEdit("name:=q").
SetSecure "4ac6e9ba26cad2886bf331a767bfa1ce055f68e66bed5d61"
The output of the above code would be:
 As you can see, you can even use SetSecure method on non password fields as well.
Another example of Crypt usage would be to create a function inside a Library and call inside your QTP Script.
pwd="QTPExpert"
Print Crypt_Func(pwd)
'The below function is there in the Library
Function Crypt_Func(password)
Crypt_Func=Crypt.Encrypt(password)
End Function
I am going to present you another example how we can encrypt a string: Using "Mercury.Encrypter"
Set var=CreateObject("Mercury.Encrypter")
Msgbox var.Encrypt("QTP")
Set var=Nothing 'Release the Object reference
Do you think of any other method or Utility to encrypt Strings? If your answer is No, then let me tell you there is a small utility program provided by QTP for encrypting strings. Its "Password Encoder".
How do I access this "Password Encoder" now? Thats simple!!
Navigate to Start-> All Programs-> QuickTest Professional-> Tools-> Password Encoder
Provide your string inside the "Password" field and click on the Generate button. Your encrypted string would be displayed inside the "Encoded String" field.
________________________________________________________________
If you like this Article, I would suggest you to subscribe my RSS feed. This way you will get all new future articles directly into your mailbox.
________________________________________________________________
Read more...
The syntax is:
Crypt.Encrypt(Your String)
An example for the same would be:
'The string "ExpertQTP" would be encrypted
var=Crypt.Encrypt("ExpertQTP") msgbox var
The output of the above code would be "4ac6e9ba26cad2886bf331a767bfa1ce055f68e66bed5d61". As you can see, this string is encrypted which cant be understood by anyone.
Please Note: Recording on password protected fields automatically encrypts your string for example
Browser("micclass:=Browser").Page("micclass:=Page").
WebEdit("name:=Password").SetSecure "4ac6e9ba26cad2886bf331a767bfa1ce055f68e66bed5d61"
Now lets see how to decrypt our string. Sounds Interesting.. Alright!! Lets read more.
Open your Internet Explorer browser and navigate to Google homepage. Copy and paste the below mentioned script in your QTP editor and run it.
Browser("micclass:=Browser").Page("micclass:=Page").
WebEdit("name:=q").
SetSecure "4ac6e9ba26cad2886bf331a767bfa1ce055f68e66bed5d61"
The output of the above code would be:
 As you can see, you can even use SetSecure method on non password fields as well.
Another example of Crypt usage would be to create a function inside a Library and call inside your QTP Script.
pwd="QTPExpert"
Print Crypt_Func(pwd)
'The below function is there in the Library
Function Crypt_Func(password)
Crypt_Func=Crypt.Encrypt(password)
End Function
I am going to present you another example how we can encrypt a string: Using "Mercury.Encrypter"
Set var=CreateObject("Mercury.Encrypter")
Msgbox var.Encrypt("QTP")
Set var=Nothing 'Release the Object reference
Do you think of any other method or Utility to encrypt Strings? If your answer is No, then let me tell you there is a small utility program provided by QTP for encrypting strings. Its "Password Encoder".
How do I access this "Password Encoder" now? Thats simple!!
Navigate to Start-> All Programs-> QuickTest Professional-> Tools-> Password Encoder
Provide your string inside the "Password" field and click on the Generate button. Your encrypted string would be displayed inside the "Encoded String" field.
________________________________________________________________
If you like this Article, I would suggest you to subscribe my RSS feed. This way you will get all new future articles directly into your mailbox.
________________________________________________________________
Read more...
Sunday, February 15, 2009
Creating Action Template in HP QuickTest Professional QTP
Did you ever thought of including some predefined statements in every new test inside your QTP software?
If your answer is yes, then please read on.
You can accomplish this through Action Templates.
Let me present a very simple example to clear this. You want to get your name as the Author of the Action in every new test which means on opening a new test, your name would be displayed by default.
A sample template would be like:
'***********************************************************************
'@Author:
'@Name:
'@Description:
'***********************************************************************
You will notice that above shown template is fully commented out. Also, the Action Template applies to all the actions created on your own computer.
Now lets see how do we create an Action Template inside HP Quicktest Professional(QTP).
Creating Action Template inside HP QTP:
Open the notepad application and copy the above mentioned code inside the notepad. Save the file with this name “ActionTemplate.mst”. Please take care of adding the double quotes while saving the file in the Save as dialog box. Navigate to the path where your Quicktest Professional software is installed. Search for a “dat” folder inside it and save the above mentioned file inside the “dat” folder.
The hierarchy would be
QuickTest Installation Folder\dat folder
After saving this file all new actions would contain the script lines from the Action Template saved just now.
Note that only the name “ActionTemplate.mst” would be recognized as an action template. It means if you change the file name to “ActionTemplate1.mst”, it would not work.
Read more...
If your answer is yes, then please read on.
You can accomplish this through Action Templates.
Let me present a very simple example to clear this. You want to get your name as the Author of the Action in every new test which means on opening a new test, your name would be displayed by default.
A sample template would be like:
'***********************************************************************
'@Author:
'@Name:
'@Description:
'***********************************************************************
You will notice that above shown template is fully commented out. Also, the Action Template applies to all the actions created on your own computer.
Now lets see how do we create an Action Template inside HP Quicktest Professional(QTP).
Creating Action Template inside HP QTP:
Open the notepad application and copy the above mentioned code inside the notepad. Save the file with this name “ActionTemplate.mst”. Please take care of adding the double quotes while saving the file in the Save as dialog box. Navigate to the path where your Quicktest Professional software is installed. Search for a “dat” folder inside it and save the above mentioned file inside the “dat” folder.
The hierarchy would be
After saving this file all new actions would contain the script lines from the Action Template saved just now.
Note that only the name “ActionTemplate.mst” would be recognized as an action template. It means if you change the file name to “ActionTemplate1.mst”, it would not work.
Read more...
Wednesday, January 7, 2009
Discovery of a Peculiar Bug in QTP Analog Recording
I take an opportunity of sharing my discovery of a new Bug in QTP with my esteemed readers. I discovered it while doing an Analog recording.
Prior to the explanation of the bug let us see the overview of the Analog Recording process according to the QTP 9.2 help file.
According to the "Guidelines for Analog and Low Level Recording" section in the QTP 9.2 help file, you will find that there are two types of Analog Recording modes:
1. Record relative to the screen
2. Record relative to a specified window
Record relative to the screen option is used when you intend to perform operations on objects in either a moving window or if you have objects across multiple windows. Also, the HP Quicktest Professional (QTP) Software captures only the Active Screen image of the final state of the window, which you just recorded.
Record relative to a specified window is used when you intend to perform operations on objects which are present in a single window only. Also HP QuickTest Professional does not capture any Active Screen images in this case.
Now coming back to the bug which happens to be the most funny part as well. The event happens to occur the other way round in case of capturing the Active screen images. What actually happens is that QTP is capturing the Active Screen image in case of "Record relative to a specified window" option as against for "Record relative to the screen" option.
The illustration of the bug goes like this: Let us go by a very simple example being presented herewith.
Open the Command prompt by navigating to Start->Run. Type "cmd" and press the return key.
After opening the command prompt, please follow the below mentioned steps to reproduce this error.
Step – 1: Click on the record button inside QTP and then Click on the "OK" button on "Record and Run Settings" dialog box.
Step – 2: After executing Step1, Analog recording button must be activated in the Automation toolbar. Click on the Analog Recording button. You will see the following screen:

Step – 3: Keep the default option "Record relative to the screen" option selected and click on the "Start Analog Record" button.
Step – 4: Move your mouse inside the command prompt window and click anywhere inside it to make this window active and type any text for example "xyz".
Step – 5: Stop the recording by clicking on the "Stop" button inside QTP.
Step – 6: Click on View->Active Screen.
Now as per the HP Quicktest Professional Help file, the active screen should be displayed. Whereas the Output what I got is shown in the following screen shot with nothing in the Active Screen.

Pretty interesting, I must say.
Now lets try the above mentioned steps for "Record relative to the following window" option.
Execute all the above Six steps as it is, however, execute the Step - 3 in the following manner:
#####################################
Alternative way of Step – 3:
"Check the "Record relative to the following window" radio button and click on the hand icon on the right. Your cursor will change to a hand.
Now move this hand to the title bar of the command prompt and click on it.
With this step, QTP captures the command prompt title as shown in the following screenshot.

Click on the "Start Analog Record" button.
#####################################
After executing the above-mentioned steps, I got the following result as shown in the following screenshot.

This is the expanded view of the above screenshot:


Bug confirmed, Hence proved :)
How about reporting this bug to the HP customer support? Whose gonna take the initiative?
Being Technology Savvy, I am sure you must be curious to read many more interesting articles on QTP; How about subscribing to my Feed? This will help you in automatically knowing the moment I post an article on my Site.
So let us join and let us Learn & Master the great Tool QTP.
Tags: HP QTP, Quicktest Professional, QTP Blog, QTP Bug, Bug inside QTP
Read more...
Sunday, January 4, 2009
Lock your PC automatically after the execution of QTP Scripts
The beauty of Automation Testing is that Scripts are run in an unattended mode.Thus, what people usually do is, prepare the batch of scripts and leave for their homes. After the batch gets over, no matter even if it passes or even get failed, the PC is unlocked inviting others to view your secret project related data.
This remains a small issue in a simple project based company. However it can become extremely devastating issue in case of a company having Finance or Banking related projects, having top most concern for the security of its data.
So one wonders as to what can be the way by which this situation can be tackled?
I had been scratching my head to device a way to lock my PC automatically after my scripts get executed?
Ultimately I cracked the hard nut by a simple way. Now lets see how..
You can use the following QTP Script to lock your PC :
Set obj = CreateObject("WScript.Shell")
sCmnd = "%windir%\SYSTEM32\rundll32.exe user32.dll,LockWorkStation"
obj.Run sCmnd, 0, False
The above QTP script will lock your PC automatically. Moreover, I will suggest you to create this script as a separate script and call this script lastly in your batch. This will solve the purpose.
Being Technology Savvy, I am sure you must be curious to read many more interesting articles on QTP; How about subscribing to my Feed? This will help you in automatically knowing the moment I post an article on my Site.
So let us join and let us Learn & Master the great Tool QTP.
Tags: HP QTP, Quicktest Professional, lock PC using QTP
Read more...
Subscribe to:
Posts (Atom)